Eclipse 2019-12 was released last December 18, 2019. Roku plugin for Eclipse is not working yet with the latest version. I will keep this post updated as I learn more. Note that Roku plugin for Eclipse works with Eclipse 2019-09(4.13), this was tested on Ubuntu 19.10.
Reference:
https://blog.roku.com/developer/roku-eclipse-plugin
https://community.roku.com/t5/Roku-Developer-Program/Roku-plugin-for-Eclipse-not-working-using-version-2019-12/m-p/531443#M44770
Sunday, December 29, 2019
Sunday, December 22, 2019
Getting "common.c: unimplemented subshell type 1" running mc in FreeBSD
I am getting the following error message as a regular user in FreeBSD (12.1)
Reference:
https://forums.freebsd.org/threads/misc-mc-problem.55627/
common.c: unimplemented subshell type 1
read (subshell_pty...): No error: 0 (0)
As a workaround, do:
$: SHELL=/bin/csh mc
Reference:
https://forums.freebsd.org/threads/misc-mc-problem.55627/
su: Sorry on FreeBSD
When running su on FreeBSD and you are getting su: Sorry that could mean that the user is not part of the wheel group. To fix this, do:
Reference:
https://graspingtech.com/freebsd-fix-su-sorry-message/
- Login as root, this can be rebooting the machine or open another TTY terminal (Alt+F2 might help).
- Re-mount root filesystem for read/write operation
- Add user to the wheel group. Assume below that u1 is the user that will be added to the group
- Remount root filesystem back to read-only
#: mount -u -w /
#: pw usermod u1 -G wheel
#: mount -u -r /
Reference:
https://graspingtech.com/freebsd-fix-su-sorry-message/
Installing FreeBSD 12.1 on VirtualBox (Windows 10 host) failed with Guru Mediation
Installing FreeBSD 12.1 on VirtualBox 6.1.0 (Windows 10 host) failed with Guru Mediation.

As a workaround, from the command line, do:
Reference:
https://forums.virtualbox.org/viewtopic.php?f=6&t=94390#p455778

As a workaround, from the command line, do:
c:\> "C:\Program Files\Oracle\VirtualBox\VBoxManage" modifyvm "FreeBSD" --spec-ctrl on
Reference:
https://forums.virtualbox.org/viewtopic.php?f=6&t=94390#p455778
View Linux process list in tree view style
$: ps -aef --forest
To show full command line argument, use:
$: ps auxfww
Saturday, December 21, 2019
How to change default font in Freeplane
I like my font to be monospace like below for my Freeplane document.
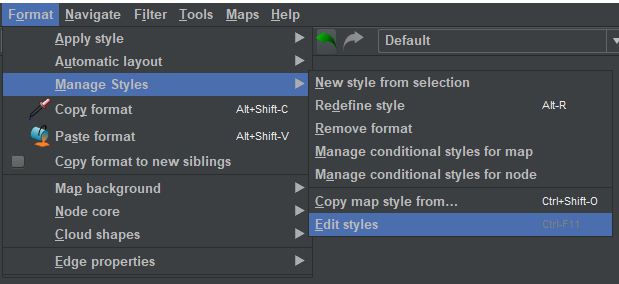
 To change Freeplane's defualt font, do Format | Manage Styles | Edit styles
 Then change Font of whole core | Font Family to say Consolas


Wednesday, December 18, 2019
Change git text editor in Git for Windows or cmder with Git
To change to VIM, do:
c:\> git config core.editor "vim"
Appium Windows Application Driver not working - looking for version 1.1
Installed Appium and Appium Windows Driver lately (12/18/2019) and observed that I can't get Windows application to be automated. It turns out that Appium v1.15.1 is hardcoded to check for Windows Application Driver version 1.1.
To workaround, I made changes to %appdata%\npm\node_modules\appium\node_modules\appium-windows-driver\build\lib\installer.js, in two areas:
To workaround, I made changes to %appdata%\npm\node_modules\appium\node_modules\appium-windows-driver\build\lib\installer.js, in two areas:
- Changed to WAD_VER = '1.2'
- Changed to WAD_EXE_MD5 = '50d694ebfaa622ef7e4061c1bf52efe6'
This file contains hidden or bidirectional Unicode text that may be interpreted or compiled differently than what appears below. To review, open the file in an editor that reveals hidden Unicode characters.
Learn more about bidirectional Unicode characters
| "use strict"; | |
| var _interopRequireDefault = require("@babel/runtime/helpers/interopRequireDefault"); | |
| Object.defineProperty(exports, "__esModule", { | |
| value: true | |
| }); | |
| exports.downloadWAD = downloadWAD; | |
| exports.setupWAD = setupWAD; | |
| exports.verifyWAD = verifyWAD; | |
| exports.installWAD = installWAD; | |
| exports.default = exports.WAD_GUID = exports.WAD_INSTALL_PATH = void 0; | |
| require("source-map-support/register"); | |
| var _requestPromise = _interopRequireDefault(require("request-promise")); | |
| var _appiumSupport = require("appium-support"); | |
| var _path = _interopRequireDefault(require("path")); | |
| var _teen_process = require("teen_process"); | |
| var _logger = _interopRequireDefault(require("./logger")); | |
| const WAD_VER = '1.2'; | |
| const WAD_DL = `https://github.com/Microsoft/WinAppDriver/releases/download/v${WAD_VER}/WindowsApplicationDriver.msi`; | |
| const WAD_DL_MD5 = '1105548ca82ea32fb7be9ca4ea21ea58'; | |
| let WAD_INSTALL_PATH = process.env['ProgramFiles(x86)'] || process.env.ProgramFiles || 'C:\\Program Files'; | |
| exports.WAD_INSTALL_PATH = WAD_INSTALL_PATH; | |
| exports.WAD_INSTALL_PATH = WAD_INSTALL_PATH = _path.default.resolve(WAD_INSTALL_PATH, 'Windows Application Driver', 'WinAppDriver.exe'); | |
| //const WAD_EXE_MD5 = '2d1b2adfb7b8d86fd890e260c1400ab7'; | |
| const WAD_EXE_MD5 = '50d694ebfaa622ef7e4061c1bf52efe6'; | |
| const WAD_GUID = 'DDCD58BF-37CF-4758-A15E-A60E7CF20E41'; | |
| exports.WAD_GUID = WAD_GUID; | |
| async function downloadWAD() { | |
| _logger.default.info(`Opening temp file to write WinAppDriver to...`); | |
| let tempFile = _path.default.resolve(process.env.TEMP, 'WinAppDriver.msi'); | |
| _logger.default.info(`Will write to ${tempFile}`); | |
| _logger.default.info(`Downloading ${WAD_DL}...`); | |
| let body = await _requestPromise.default.get({ | |
| url: WAD_DL, | |
| encoding: 'binary' | |
| }); | |
| _logger.default.info(`Writing binary content to ${tempFile}...`); | |
| await _appiumSupport.fs.writeFile(tempFile, body, { | |
| encoding: 'binary' | |
| }); | |
| let downloadedMd5 = await _appiumSupport.fs.md5(tempFile); | |
| if (downloadedMd5 !== WAD_DL_MD5) { | |
| throw new Error(`Checksum validation error: expected ${WAD_DL_MD5} but ` + `got ${downloadedMd5}`); | |
| } | |
| return tempFile; | |
| } | |
| async function installWAD(msiPath) { | |
| _logger.default.info(`Running MSI installer...`); | |
| await (0, _teen_process.exec)('msiexec', ['/i', msiPath, '/qn']); | |
| } | |
| async function verifyWAD() { | |
| _logger.default.info(`You must use WinAppDriver version ${WAD_VER}`); | |
| _logger.default.info(`Verifying WinAppDriver version ${WAD_VER} is installed via comparing the checksum.`); | |
| let md5 = await _appiumSupport.fs.md5(WAD_INSTALL_PATH); | |
| _logger.default.info(`MD5 : ${md5}`); | |
| _logger.default.info(`MD5_: ${WAD_EXE_MD5}`); | |
| return (await _appiumSupport.fs.exists(WAD_INSTALL_PATH)) && (await _appiumSupport.fs.md5(WAD_INSTALL_PATH)) === WAD_EXE_MD5; | |
| } | |
| async function isAdmin() { | |
| let testFilePath = _path.default.resolve('/', 'Windows', 'System32', 'wad-test.txt'); | |
| try { | |
| await _appiumSupport.fs.rimraf(testFilePath); | |
| await _appiumSupport.fs.writeFile(testFilePath, 'foo'); | |
| return true; | |
| } catch (ign) { | |
| return false; | |
| } | |
| } | |
| async function setupWAD() { | |
| if (!_appiumSupport.system.isWindows()) { | |
| throw new Error(`Can only download WinAppDriver on Windows!`); | |
| } | |
| if (await verifyWAD()) { | |
| _logger.default.info(`WinAppDriver.exe version ${WAD_VER} already exists with correct checksum, not re-downloading`); | |
| return; | |
| } | |
| _logger.default.info(`WinAppDriver.exe doesn't exist at the correct version ${WAD_VER}, setting up`); | |
| if (!(await isAdmin())) { | |
| throw new Error(`WARNING: You are not running as an administrator so WinAppDriver cannot be installed for you; please reinstall as admin`); | |
| } | |
| const msiPath = await downloadWAD(); | |
| await installWAD(msiPath); | |
| if (!(await verifyWAD())) { | |
| throw new Error(`Installed version of WinAppDriver failed checksum check`); | |
| } | |
| } | |
| var _default = setupWAD; | |
| exports.default = _default;require('source-map-support').install(); | |
| //# sourceMappingURL=data:application/json;charset=utf8;base64,eyJ2ZXJzaW9uIjozLCJzb3VyY2VzIjpbImxpYi9pbnN0YWxsZXIuanMiXSwibmFtZXMiOlsiV0FEX1ZFUiIsIldBRF9ETCIsIldBRF9ETF9NRDUiLCJXQURfSU5TVEFMTF9QQVRIIiwicHJvY2VzcyIsImVudiIsIlByb2dyYW1GaWxlcyIsInBhdGgiLCJyZXNvbHZlIiwiV0FEX0VYRV9NRDUiLCJXQURfR1VJRCIsImRvd25sb2FkV0FEIiwibG9nIiwiaW5mbyIsInRlbXBGaWxlIiwiVEVNUCIsImJvZHkiLCJyZXF1ZXN0IiwiZ2V0IiwidXJsIiwiZW5jb2RpbmciLCJmcyIsIndyaXRlRmlsZSIsImRvd25sb2FkZWRNZDUiLCJtZDUiLCJFcnJvciIsImluc3RhbGxXQUQiLCJtc2lQYXRoIiwidmVyaWZ5V0FEIiwiZXhpc3RzIiwiaXNBZG1pbiIsInRlc3RGaWxlUGF0aCIsInJpbXJhZiIsImlnbiIsInNldHVwV0FEIiwic3lzdGVtIiwiaXNXaW5kb3dzIl0sIm1hcHBpbmdzIjoiOzs7Ozs7Ozs7Ozs7Ozs7QUFBQTs7QUFDQTs7QUFDQTs7QUFDQTs7QUFDQTs7QUFFQSxNQUFNQSxPQUFPLEdBQUcsS0FBaEI7QUFDQSxNQUFNQyxNQUFNLEdBQUksZ0VBQStERCxPQUFRLCtCQUF2RjtBQUNBLE1BQU1FLFVBQVUsR0FBRyxrQ0FBbkI7QUFFQSxJQUFJQyxnQkFBZ0IsR0FBR0MsT0FBTyxDQUFDQyxHQUFSLENBQVksbUJBQVosS0FBb0NELE9BQU8sQ0FBQ0MsR0FBUixDQUFZQyxZQUFoRCxJQUFnRSxtQkFBdkY7O0FBQ0EsMkJBQUFILGdCQUFnQixHQUFHSSxjQUFLQyxPQUFMLENBQWFMLGdCQUFiLEVBQStCLDRCQUEvQixFQUNhLGtCQURiLENBQW5CO0FBRUEsTUFBTU0sV0FBVyxHQUFHLGtDQUFwQjtBQUNBLE1BQU1DLFFBQVEsR0FBRyxzQ0FBakI7OztBQUVBLGVBQWVDLFdBQWYsR0FBOEI7QUFDNUJDLGtCQUFJQyxJQUFKLENBQVUsK0NBQVY7O0FBQ0EsTUFBSUMsUUFBUSxHQUFHUCxjQUFLQyxPQUFMLENBQWFKLE9BQU8sQ0FBQ0MsR0FBUixDQUFZVSxJQUF6QixFQUErQixrQkFBL0IsQ0FBZjs7QUFDQUgsa0JBQUlDLElBQUosQ0FBVSxpQkFBZ0JDLFFBQVMsRUFBbkM7O0FBR0FGLGtCQUFJQyxJQUFKLENBQVUsZUFBY1osTUFBTyxLQUEvQjs7QUFDQSxNQUFJZSxJQUFJLEdBQUcsTUFBTUMsd0JBQVFDLEdBQVIsQ0FBWTtBQUFDQyxJQUFBQSxHQUFHLEVBQUVsQixNQUFOO0FBQWNtQixJQUFBQSxRQUFRLEVBQUU7QUFBeEIsR0FBWixDQUFqQjs7QUFDQVIsa0JBQUlDLElBQUosQ0FBVSw2QkFBNEJDLFFBQVMsS0FBL0M7O0FBQ0EsUUFBTU8sa0JBQUdDLFNBQUgsQ0FBYVIsUUFBYixFQUF1QkUsSUFBdkIsRUFBNkI7QUFBQ0ksSUFBQUEsUUFBUSxFQUFFO0FBQVgsR0FBN0IsQ0FBTjtBQUdBLE1BQUlHLGFBQWEsR0FBRyxNQUFNRixrQkFBR0csR0FBSCxDQUFPVixRQUFQLENBQTFCOztBQUNBLE1BQUlTLGFBQWEsS0FBS3JCLFVBQXRCLEVBQWtDO0FBQ2hDLFVBQU0sSUFBSXVCLEtBQUosQ0FBVyx1Q0FBc0N2QixVQUFXLE9BQWxELEdBQ0MsT0FBTXFCLGFBQWMsRUFEL0IsQ0FBTjtBQUVEOztBQUVELFNBQU9ULFFBQVA7QUFDRDs7QUFFRCxlQUFlWSxVQUFmLENBQTJCQyxPQUEzQixFQUFvQztBQUNsQ2Ysa0JBQUlDLElBQUosQ0FBVSwwQkFBVjs7QUFDQSxRQUFNLHdCQUFLLFNBQUwsRUFBZ0IsQ0FBQyxJQUFELEVBQU9jLE9BQVAsRUFBZ0IsS0FBaEIsQ0FBaEIsQ0FBTjtBQUNEOztBQUVELGVBQWVDLFNBQWYsR0FBNEI7QUFDMUJoQixrQkFBSUMsSUFBSixDQUFVLHFDQUFvQ2IsT0FBUSxFQUF0RDs7QUFDQVksa0JBQUlDLElBQUosQ0FBVSxrQ0FBaUNiLE9BQVEsMkNBQW5EOztBQUNBLFNBQU8sT0FBTXFCLGtCQUFHUSxNQUFILENBQVUxQixnQkFBVixDQUFOLEtBQ0EsT0FBTWtCLGtCQUFHRyxHQUFILENBQU9yQixnQkFBUCxDQUFOLE1BQW1DTSxXQUQxQztBQUVEOztBQUVELGVBQWVxQixPQUFmLEdBQTBCO0FBQ3hCLE1BQUlDLFlBQVksR0FBR3hCLGNBQUtDLE9BQUwsQ0FBYSxHQUFiLEVBQWtCLFNBQWxCLEVBQTZCLFVBQTdCLEVBQXlDLGNBQXpDLENBQW5COztBQUNBLE1BQUk7QUFDRixVQUFNYSxrQkFBR1csTUFBSCxDQUFVRCxZQUFWLENBQU47QUFDQSxVQUFNVixrQkFBR0MsU0FBSCxDQUFhUyxZQUFiLEVBQTJCLEtBQTNCLENBQU47QUFDQSxXQUFPLElBQVA7QUFDRCxHQUpELENBSUUsT0FBT0UsR0FBUCxFQUFZO0FBQ1osV0FBTyxLQUFQO0FBQ0Q7QUFDRjs7QUFFRCxlQUFlQyxRQUFmLEdBQTJCO0FBQ3pCLE1BQUksQ0FBQ0Msc0JBQU9DLFNBQVAsRUFBTCxFQUF5QjtBQUN2QixVQUFNLElBQUlYLEtBQUosQ0FBVyw0Q0FBWCxDQUFOO0FBQ0Q7O0FBRUQsTUFBSSxNQUFNRyxTQUFTLEVBQW5CLEVBQXVCO0FBQ3JCaEIsb0JBQUlDLElBQUosQ0FBVSw0QkFBMkJiLE9BQVEsMkRBQTdDOztBQUNBO0FBQ0Q7O0FBRURZLGtCQUFJQyxJQUFKLENBQVUseURBQXdEYixPQUFRLGNBQTFFOztBQUVBLE1BQUksRUFBQyxNQUFNOEIsT0FBTyxFQUFkLENBQUosRUFBc0I7QUFDcEIsVUFBTSxJQUFJTCxLQUFKLENBQVcseUhBQVgsQ0FBTjtBQUNEOztBQUVELFFBQU1FLE9BQU8sR0FBRyxNQUFNaEIsV0FBVyxFQUFqQztBQUNBLFFBQU1lLFVBQVUsQ0FBQ0MsT0FBRCxDQUFoQjs7QUFDQSxNQUFJLEVBQUMsTUFBTUMsU0FBUyxFQUFoQixDQUFKLEVBQXdCO0FBQ3RCLFVBQU0sSUFBSUgsS0FBSixDQUFXLHlEQUFYLENBQU47QUFDRDtBQUNGOztlQUtjUyxRIiwic291cmNlc0NvbnRlbnQiOlsiaW1wb3J0IHJlcXVlc3QgZnJvbSAncmVxdWVzdC1wcm9taXNlJztcbmltcG9ydCB7IHN5c3RlbSwgZnMgfSBmcm9tICdhcHBpdW0tc3VwcG9ydCc7XG5pbXBvcnQgcGF0aCBmcm9tICdwYXRoJztcbmltcG9ydCB7IGV4ZWMgfSBmcm9tICd0ZWVuX3Byb2Nlc3MnO1xuaW1wb3J0IGxvZyBmcm9tICcuL2xvZ2dlcic7XG5cbmNvbnN0IFdBRF9WRVIgPSAnMS4xJztcbmNvbnN0IFdBRF9ETCA9IGBodHRwczovL2dpdGh1Yi5jb20vTWljcm9zb2Z0L1dpbkFwcERyaXZlci9yZWxlYXNlcy9kb3dubG9hZC92JHtXQURfVkVSfS9XaW5kb3dzQXBwbGljYXRpb25Ecml2ZXIubXNpYDtcbmNvbnN0IFdBRF9ETF9NRDUgPSAnMTEwNTU0OGNhODJlYTMyZmI3YmU5Y2E0ZWEyMWVhNTgnO1xuXG5sZXQgV0FEX0lOU1RBTExfUEFUSCA9IHByb2Nlc3MuZW52WydQcm9ncmFtRmlsZXMoeDg2KSddIHx8IHByb2Nlc3MuZW52LlByb2dyYW1GaWxlcyB8fCAnQzpcXFxcUHJvZ3JhbSBGaWxlcyc7XG5XQURfSU5TVEFMTF9QQVRIID0gcGF0aC5yZXNvbHZlKFdBRF9JTlNUQUxMX1BBVEgsICdXaW5kb3dzIEFwcGxpY2F0aW9uIERyaXZlcicsXG4gICAgICAgICAgICAgICAgICAgICAgICAgICAgICAgICdXaW5BcHBEcml2ZXIuZXhlJyk7XG5jb25zdCBXQURfRVhFX01ENSA9ICcyZDFiMmFkZmI3YjhkODZmZDg5MGUyNjBjMTQwMGFiNyc7XG5jb25zdCBXQURfR1VJRCA9ICdERENENThCRi0zN0NGLTQ3NTgtQTE1RS1BNjBFN0NGMjBFNDEnO1xuXG5hc3luYyBmdW5jdGlvbiBkb3dubG9hZFdBRCAoKSB7XG4gIGxvZy5pbmZvKGBPcGVuaW5nIHRlbXAgZmlsZSB0byB3cml0ZSBXaW5BcHBEcml2ZXIgdG8uLi5gKTtcbiAgbGV0IHRlbXBGaWxlID0gcGF0aC5yZXNvbHZlKHByb2Nlc3MuZW52LlRFTVAsICdXaW5BcHBEcml2ZXIubXNpJyk7XG4gIGxvZy5pbmZvKGBXaWxsIHdyaXRlIHRvICR7dGVtcEZpbGV9YCk7XG5cbiAgLy8gYWN0dWFsbHkgZG93bmxvYWQgdGhlIG1zaSBmaWxlXG4gIGxvZy5pbmZvKGBEb3dubG9hZGluZyAke1dBRF9ETH0uLi5gKTtcbiAgbGV0IGJvZHkgPSBhd2FpdCByZXF1ZXN0LmdldCh7dXJsOiBXQURfREwsIGVuY29kaW5nOiAnYmluYXJ5J30pO1xuICBsb2cuaW5mbyhgV3JpdGluZyBiaW5hcnkgY29udGVudCB0byAke3RlbXBGaWxlfS4uLmApO1xuICBhd2FpdCBmcy53cml0ZUZpbGUodGVtcEZpbGUsIGJvZHksIHtlbmNvZGluZzogJ2JpbmFyeSd9KTtcblxuICAvLyB2YWxpZGF0ZSBjaGVja3N1bVxuICBsZXQgZG93bmxvYWRlZE1kNSA9IGF3YWl0IGZzLm1kNSh0ZW1wRmlsZSk7XG4gIGlmIChkb3dubG9hZGVkTWQ1ICE9PSBXQURfRExfTUQ1KSB7XG4gICAgdGhyb3cgbmV3IEVycm9yKGBDaGVja3N1bSB2YWxpZGF0aW9uIGVycm9yOiBleHBlY3RlZCAke1dBRF9ETF9NRDV9IGJ1dCBgICtcbiAgICAgICAgICAgICAgICAgICAgYGdvdCAke2Rvd25sb2FkZWRNZDV9YCk7XG4gIH1cblxuICByZXR1cm4gdGVtcEZpbGU7XG59XG5cbmFzeW5jIGZ1bmN0aW9uIGluc3RhbGxXQUQgKG1zaVBhdGgpIHtcbiAgbG9nLmluZm8oYFJ1bm5pbmcgTVNJIGluc3RhbGxlci4uLmApO1xuICBhd2FpdCBleGVjKCdtc2lleGVjJywgWycvaScsIG1zaVBhdGgsICcvcW4nXSk7XG59XG5cbmFzeW5jIGZ1bmN0aW9uIHZlcmlmeVdBRCAoKSB7XG4gIGxvZy5pbmZvKGBZb3UgbXVzdCB1c2UgV2luQXBwRHJpdmVyIHZlcnNpb24gJHtXQURfVkVSfWApO1xuICBsb2cuaW5mbyhgVmVyaWZ5aW5nIFdpbkFwcERyaXZlciB2ZXJzaW9uICR7V0FEX1ZFUn0gaXMgaW5zdGFsbGVkIHZpYSBjb21wYXJpbmcgdGhlIGNoZWNrc3VtLmApO1xuICByZXR1cm4gYXdhaXQgZnMuZXhpc3RzKFdBRF9JTlNUQUxMX1BBVEgpICYmXG4gICAgICAgICBhd2FpdCBmcy5tZDUoV0FEX0lOU1RBTExfUEFUSCkgPT09IFdBRF9FWEVfTUQ1O1xufVxuXG5hc3luYyBmdW5jdGlvbiBpc0FkbWluICgpIHtcbiAgbGV0IHRlc3RGaWxlUGF0aCA9IHBhdGgucmVzb2x2ZSgnLycsICdXaW5kb3dzJywgJ1N5c3RlbTMyJywgJ3dhZC10ZXN0LnR4dCcpO1xuICB0cnkge1xuICAgIGF3YWl0IGZzLnJpbXJhZih0ZXN0RmlsZVBhdGgpO1xuICAgIGF3YWl0IGZzLndyaXRlRmlsZSh0ZXN0RmlsZVBhdGgsICdmb28nKTtcbiAgICByZXR1cm4gdHJ1ZTtcbiAgfSBjYXRjaCAoaWduKSB7XG4gICAgcmV0dXJuIGZhbHNlO1xuICB9XG59XG5cbmFzeW5jIGZ1bmN0aW9uIHNldHVwV0FEICgpIHtcbiAgaWYgKCFzeXN0ZW0uaXNXaW5kb3dzKCkpIHtcbiAgICB0aHJvdyBuZXcgRXJyb3IoYENhbiBvbmx5IGRvd25sb2FkIFdpbkFwcERyaXZlciBvbiBXaW5kb3dzIWApO1xuICB9XG5cbiAgaWYgKGF3YWl0IHZlcmlmeVdBRCgpKSB7XG4gICAgbG9nLmluZm8oYFdpbkFwcERyaXZlci5leGUgdmVyc2lvbiAke1dBRF9WRVJ9IGFscmVhZHkgZXhpc3RzIHdpdGggY29ycmVjdCBjaGVja3N1bSwgbm90IHJlLWRvd25sb2FkaW5nYCk7XG4gICAgcmV0dXJuO1xuICB9XG5cbiAgbG9nLmluZm8oYFdpbkFwcERyaXZlci5leGUgZG9lc24ndCBleGlzdCBhdCB0aGUgY29ycmVjdCB2ZXJzaW9uICR7V0FEX1ZFUn0sIHNldHRpbmcgdXBgKTtcblxuICBpZiAoIWF3YWl0IGlzQWRtaW4oKSkge1xuICAgIHRocm93IG5ldyBFcnJvcihgV0FSTklORzogWW91IGFyZSBub3QgcnVubmluZyBhcyBhbiBhZG1pbmlzdHJhdG9yIHNvIFdpbkFwcERyaXZlciBjYW5ub3QgYmUgaW5zdGFsbGVkIGZvciB5b3U7IHBsZWFzZSByZWluc3RhbGwgYXMgYWRtaW5gKTtcbiAgfVxuXG4gIGNvbnN0IG1zaVBhdGggPSBhd2FpdCBkb3dubG9hZFdBRCgpO1xuICBhd2FpdCBpbnN0YWxsV0FEKG1zaVBhdGgpO1xuICBpZiAoIWF3YWl0IHZlcmlmeVdBRCgpKSB7XG4gICAgdGhyb3cgbmV3IEVycm9yKGBJbnN0YWxsZWQgdmVyc2lvbiBvZiBXaW5BcHBEcml2ZXIgZmFpbGVkIGNoZWNrc3VtIGNoZWNrYCk7XG4gIH1cbn1cblxuZXhwb3J0IHtcbiAgZG93bmxvYWRXQUQsIHNldHVwV0FELCB2ZXJpZnlXQUQsIGluc3RhbGxXQUQsIFdBRF9JTlNUQUxMX1BBVEgsIFdBRF9HVUlELFxufTtcbmV4cG9ydCBkZWZhdWx0IHNldHVwV0FEO1xuIl0sImZpbGUiOiJsaWIvaW5zdGFsbGVyLmpzIiwic291cmNlUm9vdCI6Ii4uLy4uIn0= |
Enable Windows 10 developer mode from the command line
c:\> reg add "HKEY_LOCAL_MACHINE\SOFTWARE\Microsoft\Windows\CurrentVersion\AppModelUnlock" /t REG_DWORD /f /v "AllowDevelopmentWithoutDevLicense" /d "1"
Reference:
https://docs.microsoft.com/en-us/windows/uwp/get-started/enable-your-device-for-development
Monday, December 16, 2019
VS Code C# for Visual Studio Code (powered by OmniSharp) plugin not finding .NET Core SDK
Running VS Code with C# for Visual Studio Code (powered by OmniSharp) plugin is complaining about the following:
This happened on my environment when I have installed dotnet-sdk using snap. To workaround, do:
Reference:
https://github.com/OmniSharp/omnisharp-vscode/issues/3077
The .NET Core SDK cannot be located. .NET Core debugging will not be enabled. Make sure the .NET Core SDK is installed and is on the path.
This happened on my environment when I have installed dotnet-sdk using snap. To workaround, do:
$: sudo ln -sv /snap/dotnet-sdk/current/dotnet /usr/local/bin/dotnet
Reference:
https://github.com/OmniSharp/omnisharp-vscode/issues/3077
Installing dotnet core SDK in Ubuntu using snap
To view currently supported version of dotnet-dsk, do:
Installing latest stable:
dotnet will not be available in the command line as snap creates dotnet-sdk.dotnet. Let us create an alias to make it convenient:
$: sudo snap install dotnet-sdk
Installing latest stable:
$: sudo snap install dotnet-sdk
dotnet will not be available in the command line as snap creates dotnet-sdk.dotnet. Let us create an alias to make it convenient:
$: sudo snap alias dotnet-sdk.dotnet dotnet
Monday, December 09, 2019
Installing TIghtVNC using Chocolatey
TightVNC is a graphical-sharing software that works in many platforms like Windows, Linux or OSX. To install TightVNC on Windows using Chocolatey, do:
Where:
p@$$w0rd - the administrator password that will be used for the TightVNC application
References:
https://www.tightvnc.com/
https://chocolatey.org/
c:\> choco install tightvnc -y --installArguments "VIEWER_ASSOCIATE_VNC_EXTENSION=1 SERVER_REGISTER_AS_SERVICE=1 SERVER_ADD_FIREWALL_EXCEPTION=1 VIEWER_ADD_FIREWALL_EXCEPTION=1 SERVER_ALLOW_SAS=1 SET_USEVNCAUTHENTICATION=1 VALUE_OF_USEVNCAUTHENTICATION=1 SET_PASSWORD=1 VALUE_OF_PASSWORD=p@$$w0rd SET_USECONTROLAUTHENTICATION=1 VALUE_OF_USECONTROLAUTHENTICATION=1 SET_CONTROLPASSWORD=1 VALUE_OF_CONTROLPASSWORD=p@$$w0rd"
Where:
p@$$w0rd - the administrator password that will be used for the TightVNC application
References:
https://www.tightvnc.com/
https://chocolatey.org/
Wednesday, December 04, 2019
Unblocking zip or exe files download from the internet or non trusted zones
When you download a zip file or an executable file from the internet using IE, Edge or Chrome on Windows, more likely than not the file will have it zone identifier in the alternate stream of the file. This information is used by Windows to determine if the file was downloaded from the internet and it can apply certain level of security precautions for the user.
In some instances, files/installers with zone identifiers will not install properly. There are multiple ways to check if the file have zone id. You can use streams, like so:
And this would spit out something like:
Or just plain PowerShell, like:
Which will actually dump more interesting information like the referrer URL and where it was downloaded, like:
There are multiple ways to remove or unblock the file. Using streams, you can unblock like:
This would spit out something, like:
Or use the File Explorer, so right click and hit on Properties of the file, then check Unblock (see below) and it on OK button.

In some instances, files/installers with zone identifiers will not install properly. There are multiple ways to check if the file have zone id. You can use streams, like so:
c:\> streams64.exe tightvnc-2.8.27-gpl-setup-64bit.msi
And this would spit out something like:
streams v1.60 - Reveal NTFS alternate streams.
Copyright (C) 2005-2016 Mark Russinovich
Sysinternals - www.sysinternals.com

C:\temp\tightvnc-2.8.27-gpl-setup-64bit.msi:
   :Zone.Identifier:$DATA       163
Or just plain PowerShell, like:
PS c:\> Get-Content -Path .\tightvnc-2.8.27-gpl-setup-64bit.msi -Stream Zone.Identifier
Which will actually dump more interesting information like the referrer URL and where it was downloaded, like:
[ZoneTransfer]
ZoneId=3
ReferrerUrl=https://www.tightvnc.com/download.php
HostUrl=https://www.tightvnc.com/download/2.8.27/tightvnc-2.8.27-gpl-setup-64bit.msi
There are multiple ways to remove or unblock the file. Using streams, you can unblock like:
c:\> streams64.exe -d tightvnc-2.8.27-gpl-setup-64bit.msi
This would spit out something, like:
streams v1.60 - Reveal NTFS alternate streams.
Copyright (C) 2005-2016 Mark Russinovich
Sysinternals - www.sysinternals.com

C:\temp\tightvnc-2.8.27-gpl-setup-64bit.msi:
   Deleted :Zone.Identifier:$DATA
Or use the File Explorer, so right click and hit on Properties of the file, then check Unblock (see below) and it on OK button.

Sample code to open and close Notepad using WhiteX
Sample code to open and close Notepad using WhiteX or TestStack.White.
This file contains hidden or bidirectional Unicode text that may be interpreted or compiled differently than what appears below. To review, open the file in an editor that reveals hidden Unicode characters.
Learn more about bidirectional Unicode characters
| using System; | |
| using System.IO; | |
| using Microsoft.VisualStudio.TestTools.UnitTesting; | |
| using TestStack.White; | |
| using TestStack.White.Factory; | |
| using TestStack.White.UIItems.Finders; | |
| using TestStack.White.UIItems.MenuItems; | |
| using TestStack.White.UIItems.WindowItems; | |
| namespace UnitTestProject1 | |
| { | |
| [TestClass] | |
| public class UnitTest1 | |
| { | |
| [TestMethod] | |
| public void TestMethod1() | |
| { | |
| var applicationName = "notepad.exe"; | |
| Application application = Application.Launch(applicationName); | |
| var window = application.GetWindow("Untitled - Notepad"); | |
| var menubar = window.MenuBars[1]; | |
| var file = menubar.MenuItem("File"); | |
| file.Click(); | |
| var fx = window.Popup; //submenus are implemented as Popup menu for Notepad | |
| var exitMenuItem = fx.Item("Exit"); | |
| exitMenuItem.Click(); | |
| } | |
| } | |
| } |
Tuesday, December 03, 2019
PS Quick Tips: Change Primary DNS Server of a network interface
PS c:\> Set-DnsClientServerAddress -InterfaceIndex 10 -serveraddresses ("192.168.137.1")
Where:
10 - is the interface index. This can be found by running Get-NetAdpater, this will be the column named ifIndex.
("192.168.137.1") - is the DNS server address(es) you want to assign to that interface, this is a comma separated list.
Note:
This only works on Powershell 3 (or maybe later).
Reference(s):
http://4sysops.com/archives/how-to-configure-a-network-interface-card-nic-with-powershell-3/
Powershell Quick Tips: Get details of network interface
PS c:\> Get-NetAdapter | where {$_.Name -eq "Ethernet 3"} | Format-List *
Ethernet 3 - is the name of the interface
Note:
This will need Powershell 3.0 or later
Powershell Quick Tips: Running SCVMM scripts
Open Virtual Machine Manage Command Shell. From the shell type:
Where:
C:\Users\User01\Documents\script1.ps1 - the script to be run
PS c:\> Invoke-Expression C:\Users\User01\Documents\script1.ps1
Where:
C:\Users\User01\Documents\script1.ps1 - the script to be run
PowerShell Quick Tips: Get membership of a given Windows user
This file contains hidden or bidirectional Unicode text that may be interpreted or compiled differently than what appears below. To review, open the file in an editor that reveals hidden Unicode characters.
Learn more about bidirectional Unicode characters
| $query = "ASSOCIATORS OF {Win32_Account.Name='timus',Domain='mydomain'} WHERE ResultRole=GroupComponent ResultClass=Win32_Account" | |
| Get-WMIObject -Query $query | Select Name |
Where:
timus - is the user you want to get membership of
mydomain - domain name or PC name if workgroup
Enable ClearType using PowerShell
When I remote desktop to Windows machines most of the time the fonts just looks ugly. This can be improved by enabling ClearType and I do this every time I connect to a box which I do several times a day. Below is a Powershell code that enables ClearType which I shamelessly copied from StackOverflow.
Reference(s):
http://stackoverflow.com/questions/5676768/enable-disable-cleartype-in-windows7
This file contains hidden or bidirectional Unicode text that may be interpreted or compiled differently than what appears below. To review, open the file in an editor that reveals hidden Unicode characters.
Learn more about bidirectional Unicode characters
| $signature = @' | |
| [DllImport("user32.dll")] | |
| public static extern bool SystemParametersInfo( | |
| uint uiAction, | |
| uint uiParam, | |
| uint pvParam, | |
| uint fWinIni); | |
| '@ | |
| $SPI_SETFONTSMOOTHING = 0x004B | |
| $SPI_SETFONTSMOOTHINGTYPE = 0x200B | |
| $SPIF_UPDATEINIFILE = 0x1 | |
| $SPIF_SENDCHANGE = 0x2 | |
| $FE_FONTSMOOTHINGCLEARTYPE = 0x2 | |
| $winapi = Add-Type -MemberDefinition $signature -Name WinAPI -PassThru | |
| [void]$winapi::SystemParametersInfo($SPI_SETFONTSMOOTHING, 1, 0, $SPIF_UPDATEINIFILE -bor $SPIF_SENDCHANGE) | |
| [void]$winapi::SystemParametersInfo($SPI_SETFONTSMOOTHINGTYPE, 0, $FE_FONTSMOOTHINGCLEARTYPE, $SPIF_UPDATEINIFILE -bor $SPIF_SENDCHANGE) |
Reference(s):
http://stackoverflow.com/questions/5676768/enable-disable-cleartype-in-windows7
Disable/Enable network interface using PowerShell
Windows 10 update 1511 sometimes losses connection inside a VirtualBox(5.0.16) VM. Mostly it happens after the host machine recovers from sleep or hibernate. Workaround I have observed so far is to disable/enable the interface. This can get boring overtime, so below is the PowerShell script that I use to automate it.
Note that O is the name of my network adapter.
This file contains hidden or bidirectional Unicode text that may be interpreted or compiled differently than what appears below. To review, open the file in an editor that reveals hidden Unicode characters.
Learn more about bidirectional Unicode characters
| $nic = Get-NetAdapter -Name 'O' | |
| "Disabling nic" | |
| $nic | Disable-NetAdapter -Confirm:$false | |
| "Enabling nic" | |
| $nic | Enable-NetAdapter |
Note that O is the name of my network adapter.
Hide an application from the taskbar
Hide an application (notepad in this case) from task bar using PowerShell
Reference(s):
http://stackoverflow.com/questions/7219063/win32-how-to-hide-3rd-party-windows-in-taskbar-by-hwnd
This file contains hidden or bidirectional Unicode text that may be interpreted or compiled differently than what appears below. To review, open the file in an editor that reveals hidden Unicode characters.
Learn more about bidirectional Unicode characters
| $code = @" | |
| [DllImport("user32.dll", SetLastError = true)] | |
| public static extern int GetWindowLong(IntPtr hWnd, int nIndex); | |
| [DllImport("user32.dll")] | |
| public static extern int SetWindowLong(IntPtr hWnd, int nIndex, int dwNewLong); | |
| [DllImport("user32.dll")] | |
| public static extern bool ShowWindow(IntPtr hWnd, int nCmdShow); | |
| "@ | |
| Add-Type -MemberDefinition $code -Name Win32Util -Namespace System | |
| $WS_VISIBLE = 0x10000000 | |
| $WS_EX_TOOLWINDOW = 0x00000080 | |
| $WS_EX_APPWINDOW = 0x00040000 | |
| $SW_HIDE = 0 | |
| $SW_SHOW = 5 | |
| $MainWindowHandle = (Get-Process -Name notepad)[0].MainWindowHandle | |
| $style = [System.Win32Util]::GetWindowLong($MainWindowHandle,$GWL_STYLE) | |
| $style = $style -band ( -bNOT ($WS_VISIBLE)) | |
| $style = $style -bor $WS_EX_TOOLWINDOW | |
| $style = $style -band ( -bNOT ($WS_EX_APPWINDOW)) | |
| [System.Win32Util]::ShowWindow($MainWindowHandle, $SW_HIDE) | |
| [System.Win32Util]::SetWindowLong($MainWindowHandle,$GWL_STYLE, $style) | |
| [System.Win32Util]::ShowWindow($MainWindowHandle, $SW_SHOW) | |
| [System.Win32Util]::ShowWindow($MainWindowHandle, $SW_HIDE) |
Reference(s):
http://stackoverflow.com/questions/7219063/win32-how-to-hide-3rd-party-windows-in-taskbar-by-hwnd
Monday, December 02, 2019
Creating Ubuntu 19.04 using Quick Create mode in Hyper-V with Enhanced Session Mode
Hyper-V that is shipped with Windows 10 1903 is supposed to have Enhanced Session Mode support for Ubuntu 19.04 when the VM was created using Quick Create option. As of December 1, 2019 Enhanced Session Mode is not working, as a workaround, do the following steps.
Assuming a Ubuntu 19.04 VM was created using "Quick Create" option, do:
1. From the host machine, run PowerShell as administrator
Replace __Ubuntu_VM_Name_here__ with the Hyper-V VM name. You have to ensure that the VM is not running at this point.
2. Power-up the VM, and then install linux-azure kernel, like:
3. Shutdown the VM. This is very important, restarting the VM does not work. You can do, like:
Once the VM is turned off, turn it back on. It should now have Enhanced Session Mode. For example, the screen dimension can be changed on connection, copy/paste between host and guest should work, also drive re-direction should work.
References:
https://wiki.archlinux.org/index.php/Hyper-V
https://github.com/microsoft/linux-vm-tools
Assuming a Ubuntu 19.04 VM was created using "Quick Create" option, do:
1. From the host machine, run PowerShell as administrator
PS c:\> Set-VM -VMName __Ubuntu_VM_Name_here__ -EnhancedSessionTransportType HvSocket
2. Power-up the VM, and then install linux-azure kernel, like:
$: sudo apt install linux-azure
3. Shutdown the VM. This is very important, restarting the VM does not work. You can do, like:
$: sudo shutdown -h now
Once the VM is turned off, turn it back on. It should now have Enhanced Session Mode. For example, the screen dimension can be changed on connection, copy/paste between host and guest should work, also drive re-direction should work.
References:
https://wiki.archlinux.org/index.php/Hyper-V
https://github.com/microsoft/linux-vm-tools
Sunday, December 01, 2019
Get BIOS tag from the command line
Quick one liner to get Windows BIOS serial number.
This only works for Windows operating system. Clip only works with Vista or later versions. Note that the output contains the string "SerialNumber" and the tag.
wmic bios get serialnumber | clip
This only works for Windows operating system. Clip only works with Vista or later versions. Note that the output contains the string "SerialNumber" and the tag.
HowTo: Take a screen capture on Galaxy S10+
To take a screen capture in Samsung Galaxy S10+, press both power and volume down buttons at the same time.
Run Midnight Commander using specified style
$: mc -S yadt256
This will run Midnight Commander using "Yet Another Dark Theme with 256 color with dark background" style.

termux powerline status configuration
termux is a terminal emulator and Linux environment on Android. To make it even better (looks), enable powerline-status. Start by installing git on termux, like:
Then clone termux-style, like:
Then install Python, like:
Next up, install powerline-status, like:
Update ~/.bash_profile to load powerline-status, like:

//xyz
x1@x1-pc:~$ pkg install git
Then clone termux-style, like:
x1@x1-pc:~$ git clone https://github.com/adi1090x/termux-style.git
x1@x1-pc:~$ cd termux-style
x1@x1-pc:~$ chmod +x setup
x1@x1-pc:~$ ./setup
x1@x1-pc:~$ termux-style
Then install Python, like:
x1@x1-pc:~$ pkg install python
Next up, install powerline-status, like:
x1@x1-pc:~$ pip install powerline-status
Update ~/.bash_profile to load powerline-status, like:
This file contains hidden or bidirectional Unicode text that may be interpreted or compiled differently than what appears below. To review, open the file in an editor that reveals hidden Unicode characters.
Learn more about bidirectional Unicode characters
| export PATH=$PATH:/data/data/com.termux/files/usr/lib/python3.8/site-packages | |
| powerline-daemon -q | |
| POWERLINE_BASH_CONTINUATION=1 | |
| POWERLINE_BASH_SELECT=1 | |
| . /data/data/com.termux/files/usr/lib/python3.8/site-packages/powerline/bindings/bash/powerline.sh |

//xyz
Simulating ESC key on iPad with Logitech Type+
I have iPad 6th gen paired with Logitech Type+ bluetooth keyboard. It is not a bad combination for doing quick remote work. Anyway, Termius+ssh+vim is pretty neat. Termius shows convenient keys including ESC key but if you wanted to use your keyboard to simulate ESC key do press fn+Home( ) keys.
) keys.
Subscribe to:
Posts (Atom)
Configuring TUN/TAP virtual network interface for use with QEMU on Xubuntu 24.04
Configuring TUN/TAP virtual network interface for use with QEMU on Xubuntu 24.04 I am planning to run qemu-system-ppc to play around QEMU ...

-
Tried to update my Ubuntu host today and it did pickup that new version of VirtualBox is available (4.1.8). All other packages installed pro...
-
 Installing MonoDevelop in OpenSUSE 12.2 from its repository was very easy. When running it for the first time though I got the message: Th...
 -
This is quick start guide how to run ssh server on QNX. Tested on QNX 6.5 (650SP1-VM.tar). # ssh-keygen -t dsa -b 1024 -f /etc/ssh/ssh...