Thursday, December 29, 2022

Create MacOS High Sierra VM on VMware Fusion 8.5.10

Create MacOS High Sierra VM on VMware Fusion 8.5.10


Creating macOS High Sierra on Mac mini using VMware Fusion 8.5.10 in 2022 was not very straightforward. From VMware documentation this should been an easy drag and drop operation using VMware Fusion 12 but not with VMware Fusion 8. Anyway, this is how I got it working.

First of, below is the environment:
Host: Mac mini (Late 2014) with 16GB memory
Host OS: maçOS Mojave
VMware Fusion: 8.5.10
Below are the steps to create the VM:


This should create a file in ~/Documents called macOS_10136_installer.dmg

With the DMG file available it is time to create the VM.
  • Create a new VM in VMware Fusion
  • Then select Install From Disk Image and hit on Continue
  • Select the macOS_10136_installer.dmg or browse for the location of the file and hit Continue.
  • Select macOS 10.12 as it is the latest that VMware Fusion 8.5.10 supports. Don't worry, it will work.
  • Notice the hard disk capacity is 40GB. If you think you needed more space in the VM you should change it, in my case I need more space, so I hit on Change Settings.
  • Give the VM a name, I am using macOSHighSierra2 and then hit on Save
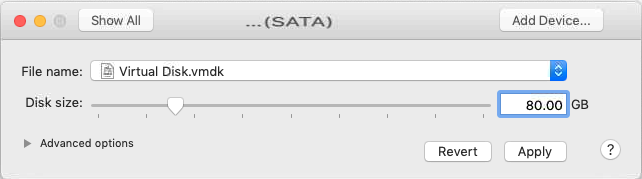
  • In the Settings window, click on Hard Disk
  • Change Disk size to 80GB and hit on Apply
  • Now click on OK and close the window. It should now be ready to start the VM.
Have fun and enjoy your new macOS High Sierra!!!
Also tested to work on the following:
- macOS 10.14 (Mojave)
- macOS 10.15 (Catalina)

Wednesday, December 28, 2022

Qt Widget hello world code only

Qt Widget hello world code only

This post shows how to create a Hello World Qt Widget application in pure code, not using the UI Designer.

▣ Create a console application - consult this link for a quick guide.
▣ Change main.cpp like below
▣ Update CMakeList.txt like below

Sunday, December 25, 2022

Add hard drive into Linux Mint 21.1 Vera/Ubuntu/Debian

Add hard drive into Linux Mint 21.1 Vera/Ubuntu/Debian

This is a condensed version on how to add hard disk into Linux Mint/Ubuntu/Debian. First check hard drives in the system, like so:
$: sudo lshw -C disk
It should show (partial data only) like this:
*-disk:1
   description: ATA Disk
   product: WDC WD3200AAKX-0
   vendor: Western Digital
   physical id: 1
   bus info: scsi@1:0.0.0
   logical name: /dev/sdb
   version: 1H15
   serial: WD-WMC2E0871450
   size: 298GiB (320GB)
   capabilities: partitioned partitioned:dos
   configuration: ansiversion=5 logicalsectorsize=512 sectorsize=512 signature=e32ff1f9
Using parted, let's now configure the harddisk/partition
$: sudo parted /dev/sdb
In parted prompt, create a new GPT partition table
(parted) mklabel gpt
Change the default unit to GB
(parted) unit GB
Create one partition occupying all the space on the drive
(parted) mkpart primary ext4 0 100%
Check to verify the layout
(parted) print
It should show something like below:
Model: ATA WDC WD3200AAKX-0 (scsi)
Disk /dev/sdb: 320GB
Sector size (logical/physical): 512B/512B
Partition Table: gpt
Disk Flags:

Number  Start   End    Size   File system  Name     Flags
 1      0.00GB  320GB  320GB  ext4         primary
Save and quit parted
(parted) quit
Format the partition using ext4
$: sudo mkfs -t ext4 /dev/sdb1
Formatting process should show something like below:
mke2fs 1.46.5 (30-Dec-2021)
/dev/sdb1 contains a ext4 file system labelled 'VMs'
        last mounted on /mnt/b41faa95-6135-47f6-a24e-ed1909d6fc18 on Sun Dec 25 19:06:43 2022
Proceed anyway? (y,N) y
Creating filesystem with 78142464 4k blocks and 19537920 inodes
Filesystem UUID: 1b7f46da-9aa6-4c30-afec-d983f35a19d5
Superblock backups stored on blocks:
        32768, 98304, 163840, 229376, 294912, 819200, 884736, 1605632, 2654208,
        4096000, 7962624, 11239424, 20480000, 23887872, 71663616

Allocating group tables: done
Writing inode tables: done
Creating journal (262144 blocks):
done
Writing superblocks and filesystem accounting information: done
Now let us create a mount point
$: sudo mkdir /mnt/vmdisk
Add an entry in fstab to automount the new partition
$: sudo vim /etc/fstab
Add a line entry in fstab like below
/dev/sdb1    /mnt/vmdisk   ext4    defaults     0        0
We should be able to use the partition without rebooting, so mount it manually for now.
$: sudo mount /mnt/vmdisk
Add directory to be writable by user
$: sudo mkdir /mnt/vmdisk/vms
Make the user named timus owner of the new folder
$: sudo chown -R timus:timus /mnt/vmdisk/vms
Refs:
https://help.ubuntu.com/community/InstallingANewHardDrive

Install VirtualBox 7.0.4 on Linux Mint 21.1 Vera

Install VirtualBox 7.0.4 on Linux Mint 21.1 Vera

▣ Download VirtualBox 7.0.4 from www.virtualbox.org, select Ubuntu 22.04.
▣ Once download is complete, open a terminal and run the following:
$: cd Downloads/
$: sudo dpkg -i virtualbox-7.0_7.0.4-154605~Ubuntu~jammy_amd64.deb
$: sudo apt -f install
$: sudo usermod -a -G vboxusers timus
Replace timus with the current user

Qt console hello world

Qt console hello world

This guide shows how a Qt console hello world looks like.

▣ Open Qt Creator and click on Create Project...
▣ Create Qt Console Application by following the section from @1 to @3. 
▣ In Project Location window provide a project name, i.e., HelloWorldConsole
▣ In Define Build System select CMake
▣ In Translation File, take the default values
▣ In Kit Selection, select the toolchain kit to be used. Below shows only one which is MinGW 64-bit. 
▣ In Project Management, take the default. 
▣ In line 6, I have added an instruction to output Hello World in to the console. Also changed to return 0 to exit the application as event loop is not needed.

▣ Gist source code shown below for convenience
▣ Running it using Qt Creator is well and good but we probably want to run it external to the IDE. To deploy the binary with all the dependencies, open the compiler environment used to build the application. In the case above we have used Qt 6.4.1 (MinGW 11.2.0 64-bit). 
▣ Run the following command (change the paths as necessary)
cd \
md tmp
cd tmp
copy C:\Users\t\Documents\build-HelloWorldConsole-Desktop_Qt_6_4_1_MinGW_64_bit-Debug\HelloWorldConsole.exe
windeployqt HelloWorldConsole.exe
▣ The folder structure should look like this. It also shows a sample out from the application. 


Keywords: CPP, Qt, Hello World

Qt Widget hello world

Qt Widget hello world

Qt Widget "Hello World" using the Designer 

▣ Open Qt Creator and click on Create Project...

▣ Create Qt Widgets Application

▣ Set project location and provide a name - HelloWorld

▣ Use CMake for the build system

▣ Use the default when defining the main class

▣ For the translation file, do the default for now

▣ Select the Kit (toolchain) to use - if you have followed this installation instruction then you will only have one option as below

▣ In the Summary, just do the default

▣ The HelloWorld project should show the editor with main.cpp files content.  Double click on mainwindow.ui to open the designer.

▣ In the Controls palette, scroll all the way down and look for Label, then drag and drop into the canvas, see below. Then double click to change the text to Hello World. Change the size to show the entire text.  

▣ Click on the Run button, see below for the location

▣ An application with MainWindow title bar and Hello World text should show up. Congratulations on your first Qt application!

Keywords: Qt Creator, Hello World

Saturday, December 24, 2022

Installing Qt Creator 9.0.1 on Windows 10

Installing Qt Creator 9.0.1 on Windows 10

This is a quick guide on installing Qt Creator 9.0.1 on Windows 10. As of December 24, 2022, the latest available online installer is qt-unified-windows-x64-4.5.1-online.exe. Binaries can be downloaded from https://www.qt.io/download, I was using Qt for open source use.

What follows are the screen captures to get working installation of Qt Creator (Qt 6.4.1).

Welcome Screen

Accept open source obligations

Welcome to open source Qt setup

Contribute to Qt development

Installation Folder - Custom installation

Select Components - Use default, add "MinGW 11.2.0 64-bit"

License Agreement

Start Menu Shortcuts

Ready to Install

Installing

Finished

Keywords: Qt Creator, CPP

Installing QNX 6.4.1 on Ubuntu 20.04

Installing QNX 6.4.1 on Ubuntu 20.04 Install pre-requisites $: sudo dpkg --add-architecture i386 $: sudo apt update $: sudo apt install li...