Many of us don't have a choice but a Windows environment, be it XP, 2k3, W2k8, W7. If you are working for a company that is a Windows shop, you have few options and probably not supported by IT.
One can install Linux/OpenSolaris/QNX/BSD on a virtual machine to enjoy the fun offered by this operating systems. Another option would be to use Cygwin. Cygwin is a Linux-like environment for Windows, for more information please visit their website.
I normally configure my Cygwin installation with the following packages installed:
- Base package (default selection)
- Emacs
- MinTTY
- Python
This selection makes me comfortable [happy :)] in any Windows enviroment (ease of use and power of Windows + power of Linux/Unix tools).
~ts
Sunday, September 12, 2010
Thursday, September 09, 2010
Installing a light-weight svn server in Windows
For those who are not familiar with SVN, it is a revision/version control system. This is much the same as CVS or Microsoft SourceSafe. The good thing with SVN is that it is designed to be a better CVS, so most features of CVS can also be expected of SVN. Directories, renames and file meta-data are versioned as well. Commits are truly atomic, meaning no part of a commit takes effect until the entire commit has succeeded. SVN can also use HTTP-based WebDAV/DeltaV protocol for network communications and the Apache web server to provide repository-side network service. It also has a standalone server option which is what we are going to discuss here how to setup in Windows XP OS. And a lot more. Visit http://subversion.tigris.org/ for more information.
Outlined below is one of the means to install/setup a standalone svn server.
1) Goto http://subversion.tigris.org/servlets/ProjectDocumentList?folderID=91
2) Download http://subversion.tigris.org/files/documents/15/36797/svn-1.4.3-setup.exe or later version.
3) Run the installer, it should put the files in C:\Program Files\Subversion\.
4) Create a folder somewhere, say d:\svnserve.
5) Copy the following files from C:\Program Files\Subversion\bin
a) intl3_svn.dll
b) libapr.dll
c) libapriconv.dll
d) libaprutil.dll
e) libdb44.dll
f) libeay32.dll
g) ssleay32.dll
h) svnserve.exe
6) On the repository directory edit conf\svnserve.conf. Enable/uncomment "anon-access = read", "auth-access = write", and "password-db = passwd"
7) On the repository directory edit conf\passwd. Under [users] add a user and a password.
8) In d:\svnserve, run
svnserve.exe --daemon --root drive:\path\to\repository
For more information visit http://www.excastle.com/blog/archive/2005/05/31/1048.aspx
Update:
Version 1.6.4 can be downloaded from here (link).
Version 1.6.5 can be downloaded from here (link)
Version 1.6.6 can be downloaded from here (link)
~ts
Wednesday, September 08, 2010
Embed Javascript in blog post
This shows a simple example of embedding Javascript in blogger. Not sure if this is supported as it messes up the anchor tag when post is edited using "Compose" instead of "Edit HTML".
Click on "Hello world" below to see Javascript in action.
Hello world
The key to embed the script is the CDATA tag.
Reference(s):
Adding javascript to Blogger posts (link)
Click on "Hello world" below to see Javascript in action.
Hello world
The key to embed the script is the CDATA tag.
Hello world
Reference(s):
Adding javascript to Blogger posts (link)
Monday, September 06, 2010
Screen capture tour of OpenSUSE 11.3 installation
This is a screen capture tour of installing OpenSUSE 11.3 in VirtualBox guest machine. I have been trying to do a screen capture documentation of the top 5 linux distributions from www.distrowatch.com. So far, this is the first distribution that suggests to have 1GB of RAM during LiveCD installation.
Though the 1GB requirement is unusual, the installation is straightforward. As can be expected from the top linux distributions nowadays, all of the activities are being done through GUI.
Below is my guest configuration:
For this post, I have used Live KDE ISO for the installation.
 Figure 1. Boot menu
 Figure 2. Language, keyboard and EULA
 Figure 3. Clock and time zone setting
 Figure 4. Suggested partition layout
 Figure 5. Create new (default) user as well as set the root password
 Figure 6. Display the current installation settings
 Figure 7. Confirm installation, note that if this is being done on a bare metal machine, this can be a destructive operation. For a virtual machine, we are safe to continue here.
 Figure 8. Installation complete, reboot machine.
 Figure 9. Full KDE desktop!!!
This is the most streamlined install I have ever done on a Linux distribution. Kudos to the OpenSUSE team for making the user experience wonderful.
Version info:
Linux kernel: 2.6.34-12-default
KDE: 4.4.4 Release 2
Firefox: 3.6.6
~ts
Though the 1GB requirement is unusual, the installation is straightforward. As can be expected from the top linux distributions nowadays, all of the activities are being done through GUI.
Below is my guest configuration:
General
Name: opensuse113
OS Type: openSUSE

System
Base Memory: 1024 MB
Processor(s): 1
Boot Order: CD/DVD-ROM, Hard Disk
VT-x/AMD-V: Enabled
Nested Paging: Enabled

Display
Video Memory: 12 MB
3D Acceleration: Disabled
2D Video Acceleration: Disabled
Remote Display Server: Disabled

Storage
IDE Controller
  IDE Secondary Master (CD/DVD): Empty
SATA Controller
  SATA Port 0: opensuse113.vdi (Normal, 120.00 GB)

Audio
Host Driver: Windows DirectSound
Controller: ICH AC97

Network
Adapter 1: Intel PRO/1000 MT Desktop (Bridged adapter, Microsoft Loopback Adapter)

Serial Ports
Disabled

USB
Device Filters: 0 (0 active)
For this post, I have used Live KDE ISO for the installation.
This is the most streamlined install I have ever done on a Linux distribution. Kudos to the OpenSUSE team for making the user experience wonderful.
Version info:
Linux kernel: 2.6.34-12-default
KDE: 4.4.4 Release 2
Firefox: 3.6.6
~ts
Installing VirtualBox guest additions in Mandriva 2010 Spring
In this blog post, I have documented via screen capture how to install Mandriva 2010 Spring. I haven't explicitly mentioned that it was being done in VirtualBox guest machine as it does not really matter much, at least for the most part not unless you have a hardware that is not supported by the distribution out of the box.
Mandriva installed VirtualBox guest additions by default but using OSE.
Online repositories are not setup by default in Mandriva, I believe this is a conscious decision to detect the best connection where the user is located. To setup the software online repositories, drill to "Application Launcher Menu( ) | Tools | System Tools | Configure Your Computer". This can also be accessed from the Plasma Panel
  . This functionality requires root privileges. Then, select and open Software Management | Configure media sources for install and update. Click on Add button, then Full set of sources, then hit on Yes. Wait and relax, this can take several seconds on fast internet connection. Once the update is done, you will be presented with a pre-selected items, the default selection should be fine, so click on Ok button.
While we are in this window, it is not a bad idea to try to update the system for any new version of the software, so do Software Management | Update your system. Follow the screen instructions to update your system. Once done, close Mandriva Linux Control Center.
Next, we have to install linux sources. To accomplish this quickly, we need to drop to CLI (command line interface). Do Application Launcher Menu | Tools | Konsole.
From the console, we need to elevate our privileges to a root user, so:
Next stop, install linux sources and devel packages.
This should not take long on fast internet connection (8Mbps). We should now be ready to install PUEL VirtualBox Guest Additions. From the main VirtualBox menu, do Devices | Install Guest Additions.... You should get a popup that a media has been plugged in, click on VBOXADDITIONS_x.y.z, then select Open with File Manager. This will mount the virtual cdrom for us.
 Figure 1. Open with File Manager.
Now, back to the console, do:
Note that if you receive new versions of VirtualBox that you only have to do the steps from mounting the guest additions from VirtualBox main menu downwards.
References:
VPNClient - How to configure & install Kernel Headers (link)
~ts
Mandriva installed VirtualBox guest additions by default but using OSE.
What's nice with VirtualBox is that it is progressing at a very quick pace, releasing an update almost on a monthly basis. Majority of the changes since 3.1.8 are small enhancements and bug fixes. You have two options in keeping current, using OSE version or PUEL version. In this post, I will document updating guest additions based on PUEL.[timus@localhost bin]$ /usr/bin/VBoxControl -v 3.1.8_OSEr61349
Online repositories are not setup by default in Mandriva, I believe this is a conscious decision to detect the best connection where the user is located. To setup the software online repositories, drill to "Application Launcher Menu(
) | Tools | System Tools | Configure Your Computer". This can also be accessed from the Plasma Panel . This functionality requires root privileges. Then, select and open Software Management | Configure media sources for install and update. Click on Add button, then Full set of sources, then hit on Yes. Wait and relax, this can take several seconds on fast internet connection. Once the update is done, you will be presented with a pre-selected items, the default selection should be fine, so click on Ok button.While we are in this window, it is not a bad idea to try to update the system for any new version of the software, so do Software Management | Update your system. Follow the screen instructions to update your system. Once done, close Mandriva Linux Control Center.
Next, we have to install linux sources. To accomplish this quickly, we need to drop to CLI (command line interface). Do Application Launcher Menu | Tools | Konsole.
From the console, we need to elevate our privileges to a root user, so:
Here, we issued su command (super user). Supply the root password as required. You should now see root@localhost.[timus@localhost ~]$ su Password: [root@localhost timus]#
Next stop, install linux sources and devel packages.
This is a long command, if you like to do it quick do copy and paste.[root@localhost timus]# urpmi kernel-`uname -r |cut -d- -f2`-devel-latest kernel-`uname -r | cut -d- -f2`-devel-`uname -r | cut -d- -f1`
This should not take long on fast internet connection (8Mbps). We should now be ready to install PUEL VirtualBox Guest Additions. From the main VirtualBox menu, do Devices | Install Guest Additions.... You should get a popup that a media has been plugged in, click on VBOXADDITIONS_x.y.z, then select Open with File Manager. This will mount the virtual cdrom for us.

Now, back to the console, do:
Of course, VBOXADDITIONS_3.2.8_64453 maybe different in your system depending on your current version number. If all goes well, you should see something like this:[root@localhost /]# cd /media/VBOXADDITIONS_3.2.8_64453/ [root@localhost VBOXADDITIONS_3.2.8_64453]# ./VBoxLinuxAdditions-x86.run
If you have made this far, that means that you have updated your guest additions successfully. Reboot the system and enjoy!!!Verifying archive integrity... All good. Uncompressing VirtualBox 3.2.8 Guest Additions for Linux........ VirtualBox Guest Additions installer You appear to have a version of the VBoxGuestAdditions software on your system which was installed from a different source or using a different type of installer. If you installed it from a package from your Linux distribution or if it is a default part of the system then we strongly recommend that you cancel this installation and remove it properly before installing this version. If this is simply an older or a damaged installation you may safely proceed. Do you wish to continue anyway? [yes or no] y Attempt to remove old DKMS modules... Done. Building the VirtualBox Guest Additions kernel modules Building the main Guest Additions module [ OK ] Building the shared folder support module [ OK ] Building the OpenGL support module [ OK ] Doing non-kernel setup of the Guest Additions [ OK ] You should restart your guest to make sure the new modules are actually used Installing the Window System drivers Installing X.Org Server 1.7 modules [ OK ] Setting up the Window System to use the Guest Additions [ OK ] You may need to restart the hal service and the Window System (or just restart the guest system) to enable the Guest Additions. Installing graphics libraries and desktop services components [ OK ]
Note that if you receive new versions of VirtualBox that you only have to do the steps from mounting the guest additions from VirtualBox main menu downwards.
References:
VPNClient - How to configure & install Kernel Headers (link)
~ts
Sunday, September 05, 2010
Screen capture tour of Mandriva 2010 Spring installation
Mandriva 2010 Spring was released July 8, 2010. It comes with kernel 2.6.33 (2.6.33.5-desktop586-2mnb), KDE 4.4.3 and Firefox 3.6.6. It actually comes with tons of applications.
Its a pretty good distribution, I particular like the functionality where it removes any unnecessary packages during the installation. I haven't seen this in Ubuntu, Fedora, Debian, PCLinuxOS, Mint, OpenSUSE nor CentOS.
What follows is a series of screen captures installing this distribution.
 Figure 1. Boot menu
 Figure 2. Language, this will be the language that will be used by the system.
 Figure 3. License agreement, of course click Accept to continue if you are happy with the agreement.
 Figure 4. Timezone, this will be used to show correct local time.
 Figure 5. Allows you to select the correct time, on some machines the BIOS can be set to localtime or UTC.
 Figure 6. Select appropriate keyboard for your system.
 Figure 7. Start of the Wizard for installing the rest of the system.
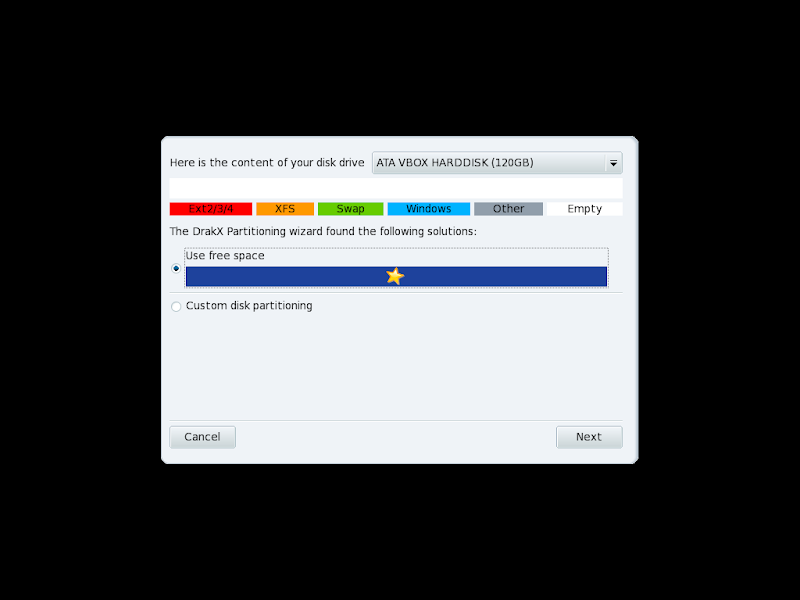 Figure 8. Partition layout, in my case I am installing this on VirtualBox guest machine so the default are just fine.
 Figure 9. Remove unused packages, this is I believe a first in Mandriva, at least when I wrote this blog. I saw that it did try to remove unused drivers and packages that I will not be needing on this virtual machine.
 Figure 10. Boot loader options, for multiboot machines like having Windows, Linux, Solaris in one machine, you may have to pay attention here otherwise the default will be fine.
 Figure 11. Select the image that will be used to used to boot the machine, in a virtual machine environment default is fine.
 Figure 12. Installation of Mandriva is now complete!!! Restart the system, next would be to configure the system.
 Figure 13. See up root password and add a user. Root user is the superuser of the system.
 Figure 14. Congratulations!!! you've now a working Mandriva system.
 Figure 15. Register an account with Mandriva, this is optional but this is probably the least you can do to help the distribution.
 Figure 16. Upload your hardware configuration to Mandriva, again would be nice to help this distribution by letting them know of the hardware profile that users have.
 Figure 17. Installation is Done!!!
 Figure 18. Logon screen
 Figure 19. This is a capture of how it looks like, pretty looking desktop.
Enjoy!
~ts
Its a pretty good distribution, I particular like the functionality where it removes any unnecessary packages during the installation. I haven't seen this in Ubuntu, Fedora, Debian, PCLinuxOS, Mint, OpenSUSE nor CentOS.
What follows is a series of screen captures installing this distribution.
Enjoy!
~ts
Subscribe to:
Posts (Atom)
-
 Installing MonoDevelop in OpenSUSE 12.2 from its repository was very easy. When running it for the first time though I got the message: Th...
 -
Tried to update my Ubuntu host today and it did pickup that new version of VirtualBox is available (4.1.8). All other packages installed pro...
-
Install Winget on Windows 2022 or Windows 10 LTSC Install Pre-reqs Install Microsoft.UI.Xaml/2.8.6 Navigate to https://www.nuget.org/pa...