Sunday, September 01, 2024

Installing QNX 6.4.1 on Ubuntu 20.04

Installing QNX 6.4.1 on Ubuntu 20.04

Install pre-requisites
$: sudo dpkg --add-architecture i386
$: sudo apt update
$: sudo apt install libc6:i386 default-jre-headless:i386 libgtk2.0-0:i386 libcanberra-gtk-module:i386 gtk2-engines-murrine:i386 libatk-adaptor:i386 gtk2-engines-pixbuf:i386 gtk2-engines:i386 libasound2-plugins:i386 libxtst6:i386
Mount QNX 6.4.1 (I am using qnxsdp-6.4.1-200905201802-dvd.iso), then install like so:
$: sudo ./qnxsdp-6.4.1-200905201802-linux.bin -silent
Logout and then log back in, then run Momentics IDE:
$: qde

How to fix "java.lang.UnsatisfiedLinkError: no swt-pi-gtk-3452 or swt-pi-gtk in swt.library.path, java.library.path or the jar file"

How to fix "java.lang.UnsatisfiedLinkError: no swt-pi-gtk-3452 or swt-pi-gtk in swt.library.path, java.library.path or the jar file"

Running a 32-bit Eclipse-based application on Ubuntu 20.04 64-bit may fail with message like below:
!SESSION 2024-09-01 04:49:52.176 ----------------------------------------------- eclipse.buildId=I20090510 java.version=1.5.0_11 java.vendor=Sun Microsystems Inc. BootLoader constants: OS=linux, ARCH=x86, WS=gtk, NL=en_US Command-line arguments: -os linux -ws gtk -arch x86 !ENTRY org.eclipse.osgi 4 0 2024-09-01 04:49:56.569 !MESSAGE Application error !STACK 1 java.lang.UnsatisfiedLinkError: no swt-pi-gtk-3452 or swt-pi-gtk in swt.library.path, java.library.path or the jar file at org.eclipse.swt.internal.Library.loadLibrary(Library.java:233) at org.eclipse.swt.internal.Library.loadLibrary(Library.java:151) at org.eclipse.swt.internal.gtk.OS.(OS.java:22) at org.eclipse.swt.internal.Converter.wcsToMbcs(Converter.java:63) at org.eclipse.swt.internal.Converter.wcsToMbcs(Converter.java:54) at org.eclipse.swt.widgets.Display.(Display.java:130) at org.eclipse.ui.internal.Workbench.createDisplay(Workbench.java:511) at org.eclipse.ui.PlatformUI.createDisplay(PlatformUI.java:161) at org.eclipse.ui.internal.ide.application.IDEApplication.createDisplay(IDEApplication.java:143) at org.eclipse.ui.internal.ide.application.IDEApplication.start(IDEApplication.java:88) at org.eclipse.equinox.internal.app.EclipseAppHandle.run(EclipseAppHandle.java:193) at org.eclipse.core.runtime.internal.adaptor.EclipseAppLauncher.runApplication(EclipseAppLauncher.java:110) at org.eclipse.core.runtime.internal.adaptor.EclipseAppLauncher.start(EclipseAppLauncher.java:79) at org.eclipse.core.runtime.adaptor.EclipseStarter.run(EclipseStarter.java:386) at org.eclipse.core.runtime.adaptor.EclipseStarter.run(EclipseStarter.java:179) at sun.reflect.NativeMethodAccessorImpl.invoke0(Native Method) at sun.reflect.NativeMethodAccessorImpl.invoke(Unknown Source) at sun.reflect.DelegatingMethodAccessorImpl.invoke(Unknown Source) at java.lang.reflect.Method.invoke(Unknown Source) at org.eclipse.equinox.launcher.Main.invokeFramework(Main.java:549) at org.eclipse.equinox.launcher.Main.basicRun(Main.java:504) at org.eclipse.equinox.launcher.Main.run(Main.java:1236) !ENTRY org.eclipse.osgi 2 0 2024-09-01 04:49:56.596 !MESSAGE The following is a complete list of bundles which are not resolved, see the prior log entry for the root cause if it exists: !SUBENTRY 1 org.eclipse.osgi 2 0 2024-09-01 04:49:56.597 !MESSAGE Bundle update@plugins/com.qnx.tools.ide.phab.ui_4.6.0.v200903271252.jar [111] was not resolved. !SUBENTRY 2 com.qnx.tools.ide.phab.ui 2 0 2024-09-01 04:49:56.597 !MESSAGE Missing required bundle com.qnx.tools.ide.phab.core_0.0.0. !SUBENTRY 1 org.eclipse.osgi 2 0 2024-09-01 04:49:56.597 !MESSAGE Bundle update@plugins/com.qnx.tools.ide.phab.core_4.6.0.v200903271252.jar [126] was not resolved. !SUBENTRY 2 com.qnx.tools.ide.phab.core 2 0 2024-09-01 04:49:56.597 !MESSAGE Platform filter did not match: (| (osgi.ws=win32) (osgi.ws=photon))
$: sudo apt-get install libxtst6:i386

Installing QNX 6.5 on Hyper-V 2022

Installing QNX 6.5 on Hyper-V 2022

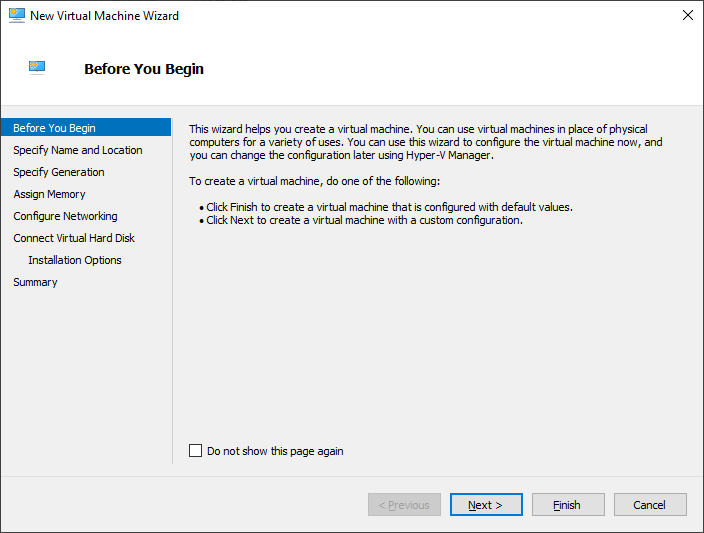
Create a VM in Hyper-V

Remove all NICs and add a legacy network adapater

Power up and install QNX 6.5

This assumes that the ISO was already mounted. It is important that DMA is disabled by pressing d and then press ENTER key.
After few seconds it should show something like below. Press F3 to install QNX into the HDD. Hereafter, default (F1) selection should be OK.
Once installation is complete, remove the ISO. Remember to disable DMA every time the VM is restarted.

Fedora install screen chronicle

Fedora install screen chronicle Below are links to Fedora installation screens. It is interesting to see how it has evolved over time. Fe...