Basics
Hello world
User input
While loop
If statement
For loop
Switch statement
Read file using ifstream
Write to a file using ofstream
Containers
Basic usage of std::list
Basic usage of std::map
Basic usage of std::vector
Data type conversion
Windows API with Exmaples
DeviceIoControl
FindFirstVolumeW
GetDiskFreeSpaceExW
GetLogicalDrives
GetLogicalDriveStrings
C++/WinRT
C++/WinRT Hello World
Qt Cross-platform
Installing Qt Creator 9.0.1 on Windows 10
Qt console hello world
Qt Widget hello world
Qt Widget hello world code only
Keywords: C++, Qt, Programming, Tutorial
Sunday, January 22, 2023
C++/WinRT Hello World
C++/WinRT Hello World
This is a quick start quide to prepare a development environment to develop against C++/WinRT.System:
Development OS: Windows 10 Pro 22H2
Target: Windows 10 LTSB build 10.0.14393
IDE: Visual Studio 2022 (used 17.4.4)
Install Visual Studio 2022 Universal Windows Platform development workload. The following is very _important_ as this is what will allow you to create C++/WinRT project. Check C++ (v143) Universal Windows Platform tools, doing so will also enable and install corresponding SDK.

After installing Visual Studio, create Windows Console Application (C++/WinRT)


Keywords: Visual Studio, C++/WinRT
Saturday, January 21, 2023
Getting the last error code while debugging even if the Win32 API returned value was not saved
Getting the last error code while debugging even if the Win32 API returned value was not saved
It is not uncommon that a Win32 API call return value is not checked in code. This information can prove to be very invaluable while debuging. Fortunately, Visual Studio saves pseudovariables which includes the value normally returned by GetLastError function. To view what would have returned by GetLastError use $err,hr in the Watch window.
Visual Studio Pseudovariables
Tags: Visual Studio, CPP
Wednesday, January 04, 2023
Getting 'You are in emergency mode. After logging in, type "journalctl -xb" to view system logs, "systemctl reboot" to reboot, "systemctl default" or "exit" to boot into default mode' after rebooting Linux Mint 21.1 Vera
On my Linux Mint 21.1 Vera machine, rebooting the machine would show the following early in the boot process
You are in emergency mode. After logging in, type "journalctl -xb" to view system logs, "systemctl reboot" to reboot, "systemctl default" or "exit" to boot into default mode.
Press Enter for maintenance
(or press Control-D to continue):

Friday, December 30, 2022
Install TightVNC server on Linux Mint 21.1 Vera
Install TightVNC server on Linux Mint 21.1 Vera
One of the options to manage VirtualBox GUI on a Linux host is via VNC server. Below is quick setup to get it up and running.$: sudo apt install tightvncserver
$: sudo apt install tmux
$: tmux
$: tightvncserver -nolisten tcp :1 -geometry 1024x768
In multiple cases, I have observed that the VNC session created was just a solid gray backgroun, no xterm, no nothing. As a work-around install XFCE4 like below
$: sudo apt install xfce4 xfce4-goodies
#!/bin/sh

xrdb "$HOME/.Xresources"
xsetroot -solid grey
#x-terminal-emulator -geometry 80x24+10+10 -ls -title "$VNCDESKTOP Desktop" &
#x-window-manager &
# Fix to make GNOME work
export XKL_XMODMAP_DISABLE=1
/etc/X11/Xsession &
startxfce4 &
Thursday, December 29, 2022
Create MacOS High Sierra VM on VMware Fusion 8.5.10
Create MacOS High Sierra VM on VMware Fusion 8.5.10
Creating macOS High Sierra on Mac mini using VMware Fusion 8.5.10 in 2022 was not very straightforward. From VMware documentation this should been an easy drag and drop operation using VMware Fusion 12 but not with VMware Fusion 8. Anyway, this is how I got it working.
First of, below is the environment:
Host: Mac mini (Late 2014) with 16GB memory
Host OS: maçOS Mojave
VMware Fusion: 8.5.10
Below are the steps to create the VM:Host OS: maçOS Mojave
VMware Fusion: 8.5.10
- On the host, visit https://support.apple.com/en-us/HT211683
- Look for macOS High Sierra, I used this link - https://apps.apple.com/us/app/macos-high-sierra/id1246284741?mt=12
- This opens the App Store. Download the High Sierra but don’t install it
- Once downloaded it will be available in /Applications/Install macOS High Sierra.app
- Clone or download a zip copy of the script that creates dmg file from an app file.The repo is located here - https://github.com/rtrouton/create_macos_vm_install_dmg
- Create dmg using the script like below
sudo sh ~/Downloads/create_macos_vm_install_dmg-main/create_macos_vm_install_dmg.sh "/Applications/Install macOS High Sierra.app" ~/Documents
This should create a file in ~/Documents called macOS_10136_installer.dmg
With the DMG file available it is time to create the VM.
- Create a new VM in VMware Fusion
-
Then select Install From Disk Image and hit on Continue
-
Select the macOS_10136_installer.dmg or browse for the location of the file and hit Continue.
-
Select macOS 10.12 as it is the latest that VMware Fusion 8.5.10 supports. Don't worry, it will work.
-
Notice the hard disk capacity is 40GB. If you think you needed more space in the VM you should change it, in my case I need more space, so I hit on Change Settings.
-
Give the VM a name, I am using macOSHighSierra2 and then hit on Save
-
In the Settings window, click on Hard Disk
-
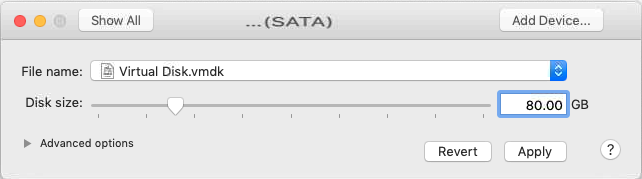
Change Disk size to 80GB and hit on Apply
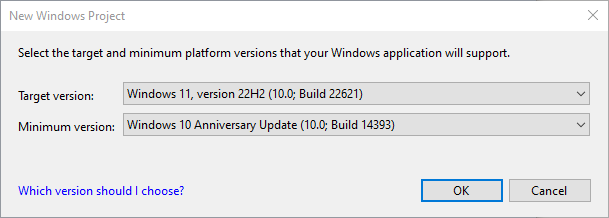
-
Now click on OK and close the window. It should now be ready to start the VM.


Also tested to work on the following:
- macOS 10.14 (Mojave)
- macOS 10.15 (Catalina)
Wednesday, December 28, 2022
Qt Widget hello world code only
Qt Widget hello world code only
This post shows how to create a Hello World Qt Widget application in pure code, not using the UI Designer.▣ Create a console application - consult this link for a quick guide.
▣ Change main.cpp like below
▣ Update CMakeList.txt like below
Subscribe to:
Posts (Atom)
-
 Installing MonoDevelop in OpenSUSE 12.2 from its repository was very easy. When running it for the first time though I got the message: Th...
 -
Tried to update my Ubuntu host today and it did pickup that new version of VirtualBox is available (4.1.8). All other packages installed pro...
-
Press Alt+F1, then type: #: reboot -p Reference(s): https://groups.google.com/forum/#!topic/android-x86/pEI7xAnOpNY